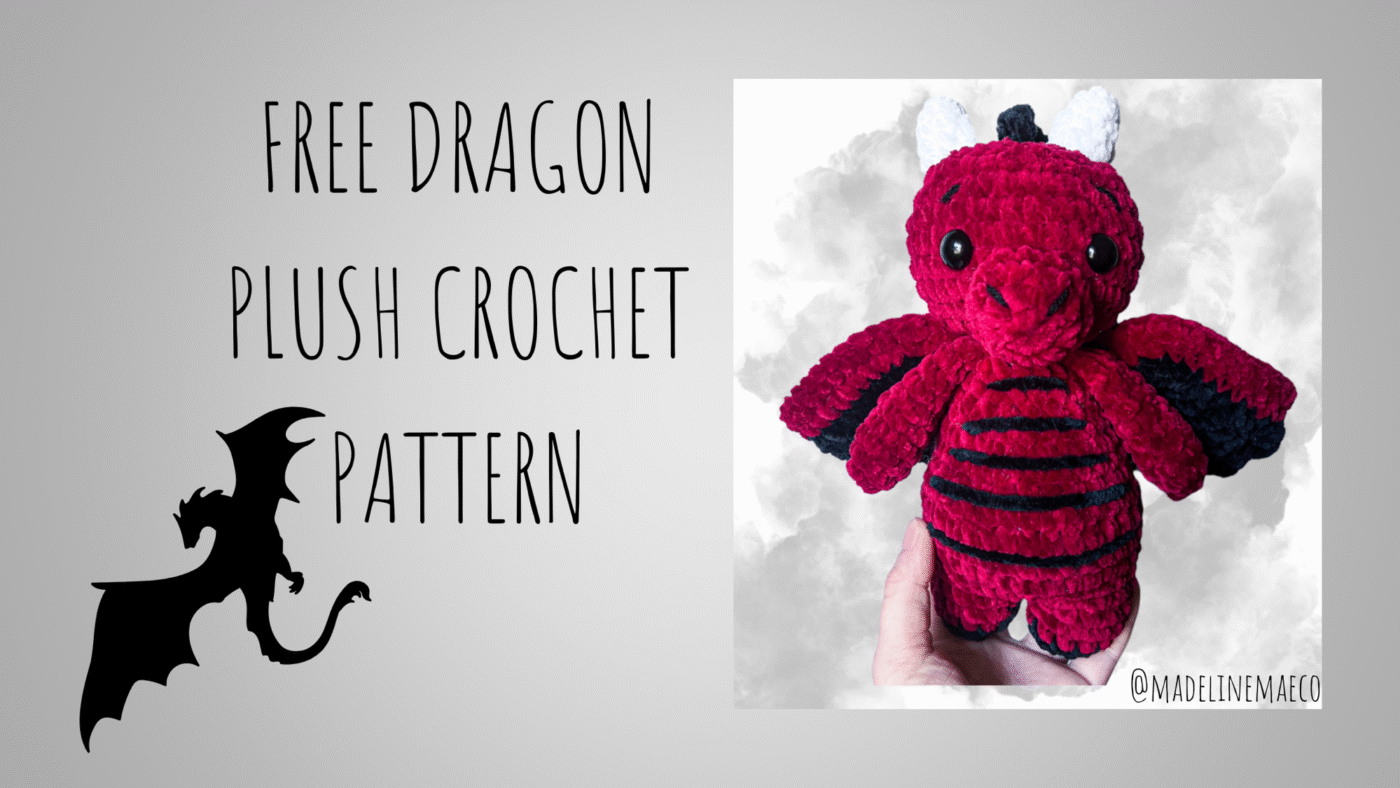
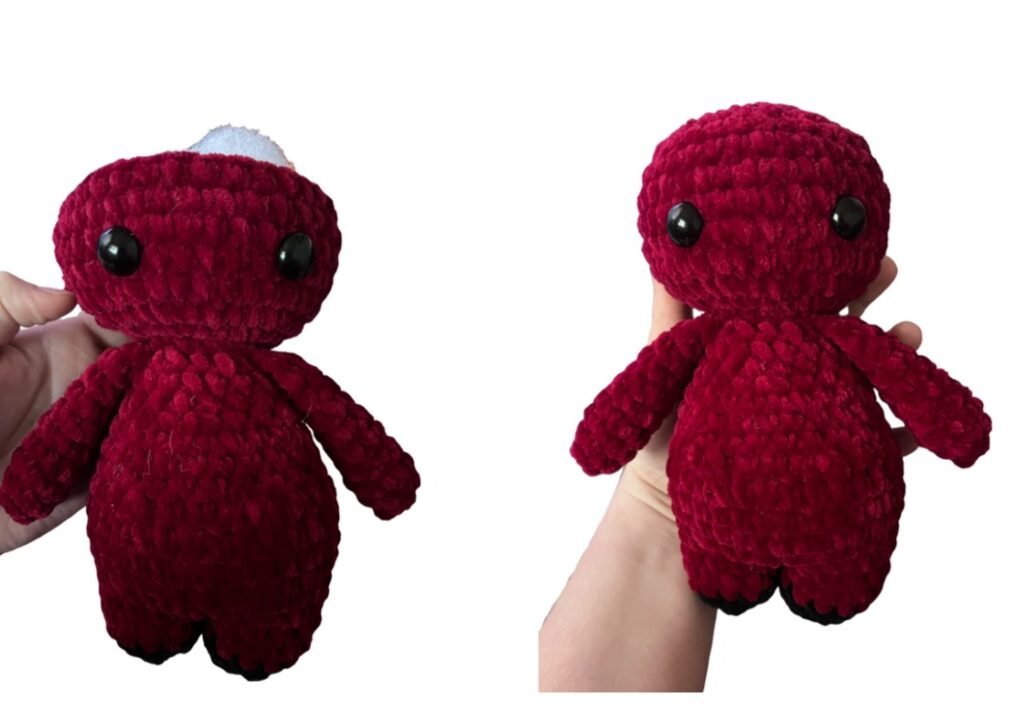
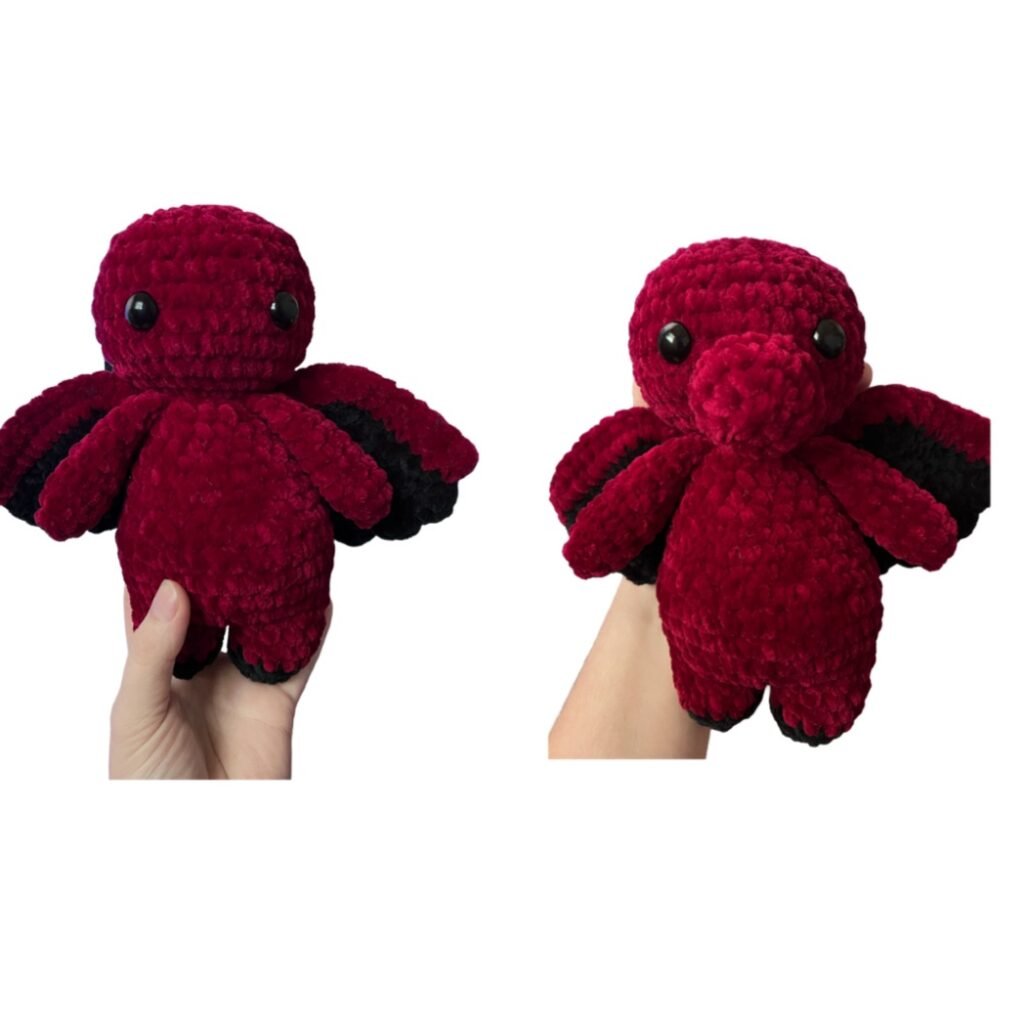
This is Steve the dragon! A pattern dedicated to my dad, Steve. My dad loved all things mythical & mystical. Dragons and Unicorns were two of his favorite creatures. I created Steve to honor my dad. It’s a pattern that really means a lot to me, and took a lot of time to create. I hope you enjoy bringing your own Steve to life 🐉
If you enjoy this pattern, please give me a follow on social media and let me know what other free patterns you would love to see! Also, don’t forget to tag me in your creations on instagram. Happy crocheting!! 🧶
You can also purchase the instant download PDF version of this pattern on my archive etsy for $1.50. Now- let’s get to it!
MATERIALS & TOOLS
One skein of each color of Premier Parfait Chunky
Yarn:
• main color (I used ruby)
• accent color (I used black)
• white for horns
(or any size 5 or 6 weight yarn)
-Black worsted weight yarn for nostril and eyebrow
details
-3.5mm or 4mm crochet hook
-Polyfil
-16mm safety/felt eyes (I use this size for parfait chunky)
-Darning needle
-Scissors
-Stitch Marker
How to read the instructions: the instructions written between * * and followed by x# will be repeated that many times. For example *inc* x12. You will increase 12 times.
ABBREVIATIONS
sc- single crochet
dec- decrease (I use the invisible decrease method)
inc- increase
mc- magic circle
ch- chain
sl st- slip stitch
F/O- finish off
BLO- back loops ONLY
hdc- half double crochet
This pattern is worked in continuous rounds. Do not slip stitch unless stated to do so. The pattern is written is US terminology. I am right handed and used the yarn under technique.
- DO NOT publish or sell this pattern in any form, if you’re sharing a pattern with a friend please share my blog with them
- You may sell creations made from this pattern
- I love seeing my patterns created by others! Please tag me in your creations 🫶🏻
STEVE THE DRAGON CROCHET PATTERN
please follow the pattern instructions IN ORDER
Arms
MAKE THE ARMS BEFORE STARTING THE BODY!!
Make two in main color:
1. 4 sc into mc
2. *inc* x4 (8)
3-10. 8 rounds of 8 sc
Stuff tips of arms very lightly, sc closed with 4 sc. (Has to be 4 sc for connecting to the body later.) F/O and leave a short tail.
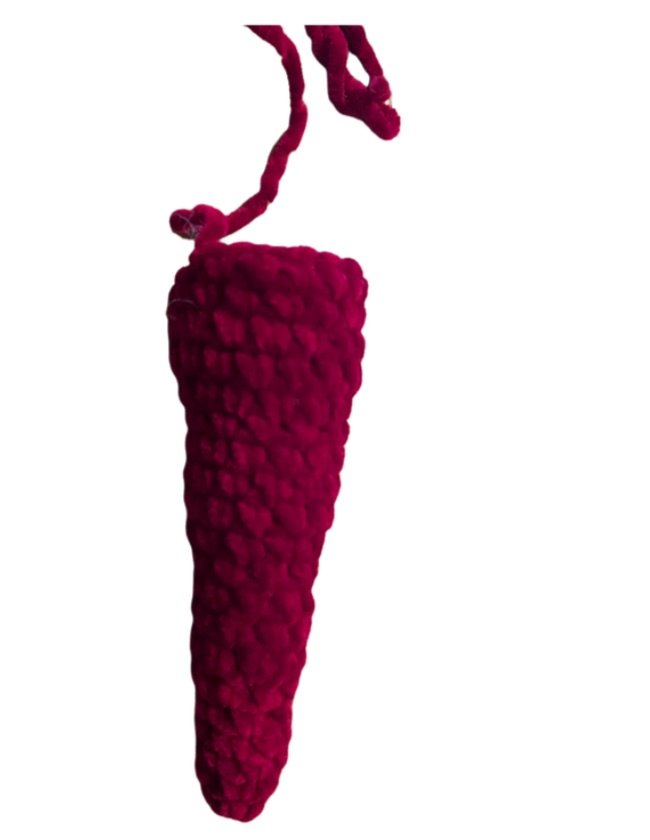
Nose
Make one in main color:
1. 7 sc into mc
2. *inc* x7 (14)
3-4. 2 rounds of 14 sc
F/O. Leave a long yarn tail for sewing. Nose will get stuffed.
Horns
Make two in white:
1. 3 sc into mc
2. *inc* x3 (6)
3. 1 round of 6 sc
4. *1 sc, inc * x3 (9)
5. 1 round of 9 sc
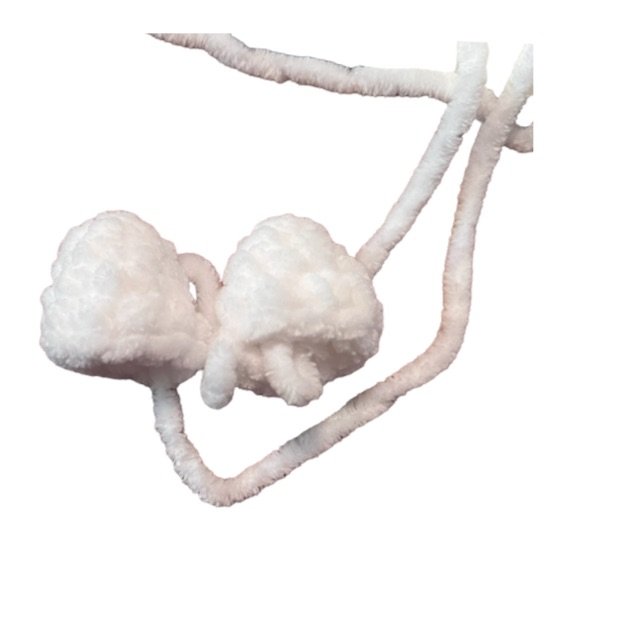
F/O. Leave long yarn tail for sewing. Horns will get stuffed.
Tail
Make one in main color:
1. 3 sc into mc (3)
2. *inc* x3 (6)
3-6. 4 rounds of 6 sc
-Start stuffing the tail.
7. *1 sc, inc* x3 (9)
8-11. 4 rounds of 9 sc
-Continue stuffing the tail.
12. *2 sc, inc* x3 (12)
13-16. 4 rounds of 12 sc
-Keep stuffing!
17. *3 sc, inc* x3 (15)
18-21. 4 rounds of 15 sc
F/O. Leave long yarn tail for sewing later.
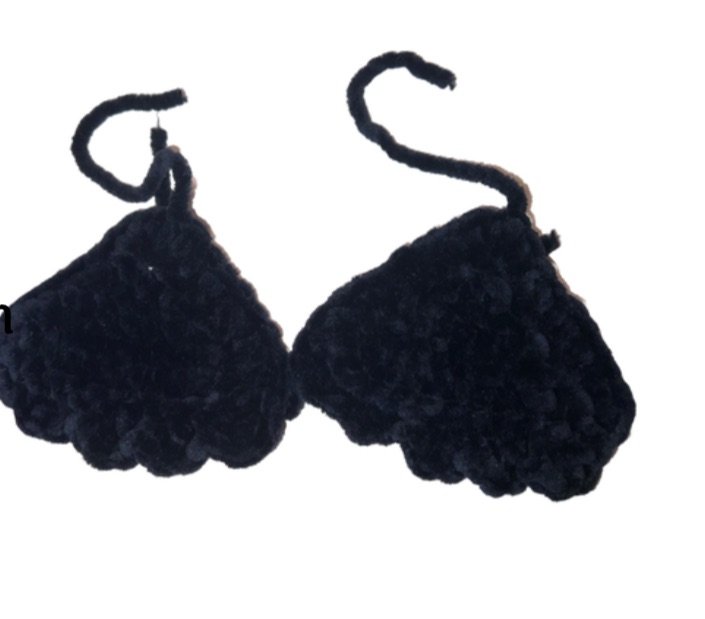
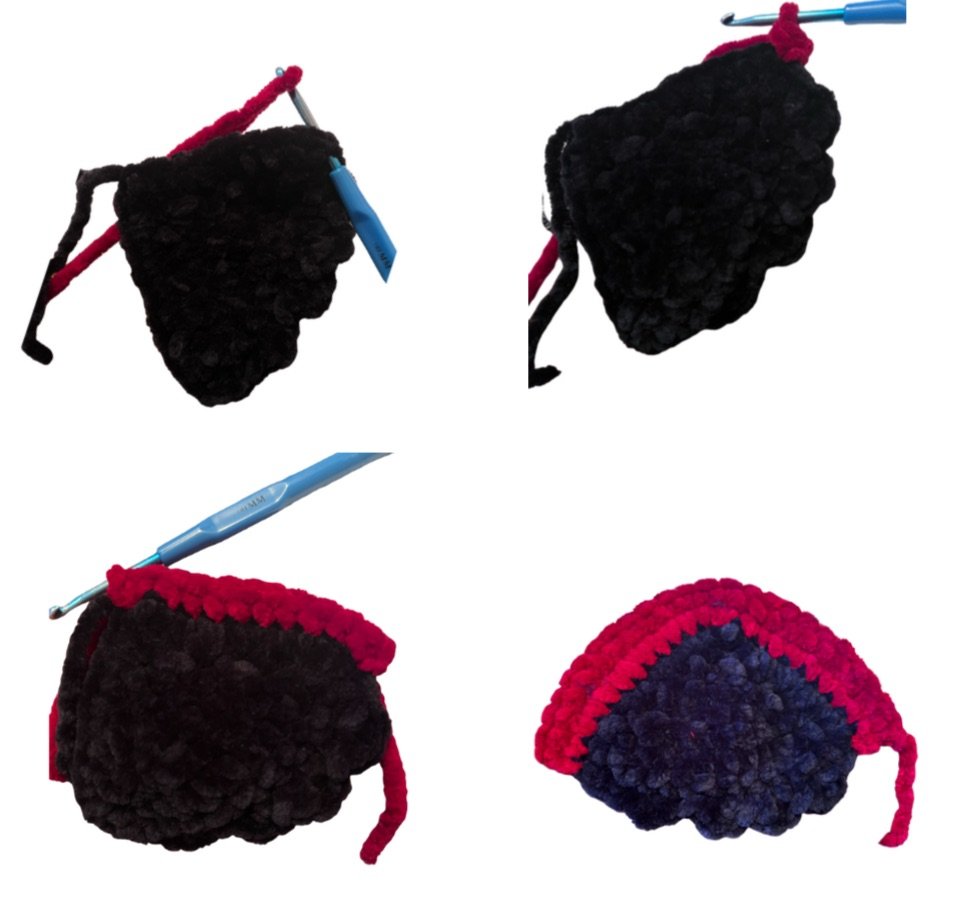
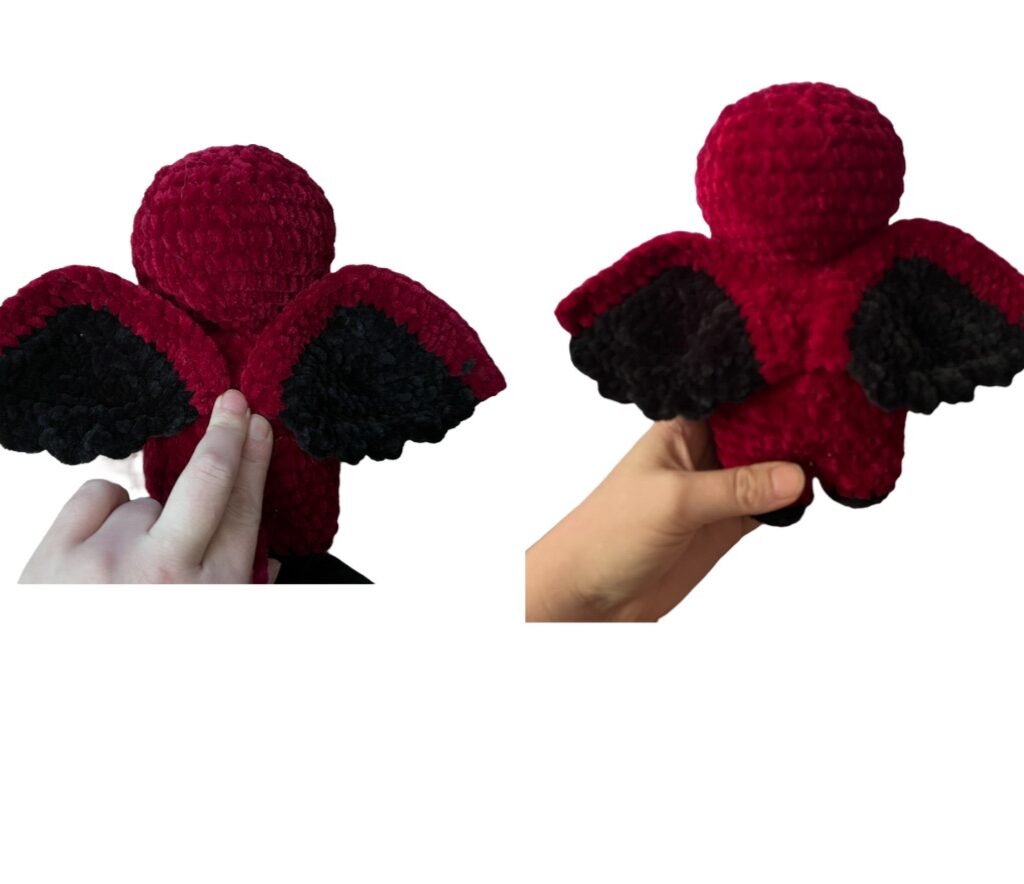
Wings
YOU WILL BE WORKING IN ROWS!!
Make two, starting in accent color:
1. Ch 13 – LOOSELY
2. In the second ch from hook place 1 sc, and continue sc down the chain for 12 sc, ch 1 and turn (12)
3. dec, 8 sc, dec, ch 1 and turn (10)
4. dec, 6 sc, dec, ch 1 and turn (8)
5. dec, 4 sc, dec, ch 1 and turn (6)
6. dec, 2 sc, dec, ch 1 and turn (4)
7. *dec* x2, ch 1 and turn (2)
8. dec, ch 1 and turn (1)
9. 2 sc in same stitch (2) MARK THE FIRST SC

Adding the Wing “details”:
continuing in accent color
1. sc down the side of the wing. the amount of stitches doesn’t really matter, but I used 9 sc. If you have more or less that is okay. Just make sure you’re placing the single crochets evenly on your work.
2. when you get to the end of the wing, you will now be working on the bottom of your starting chain. You’ll *sc, hdc, sc into one stitch and then sl st into the next stitch* and repeats the sequence between “* *” 6 times. You will have 6 bumps and 6 slip stitches.
3. now sc back up the wing, again the amount of stitches doesn’t really matter. Just make sure they’re evenly placed. I used 9 sc. if you have more that is okay. You’re just framing your work here. When you reach the top, sl st to attach to the sc you marked in row 9 and F/O with a short yarn tail.
Wing Bones
IN MAIN COLOR: (REFER TO PHOTOS)
1. At the end of the wing sl st, ch 1 and sc into the same stitch.
2. sc up the wing, when you get to the point of the wing place TWO single crochets into one stitch.
3. sc down the wing, when you reach the end ch 1 and turn
4. now sc back up the wing and down the wing once more. When you reach the end
F/O. Leave a long yarn tail for sewing later.
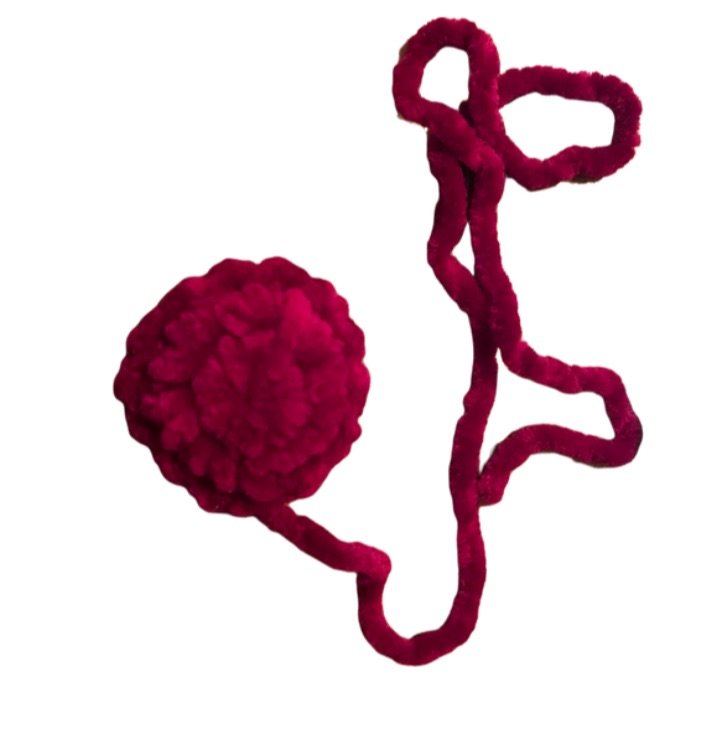
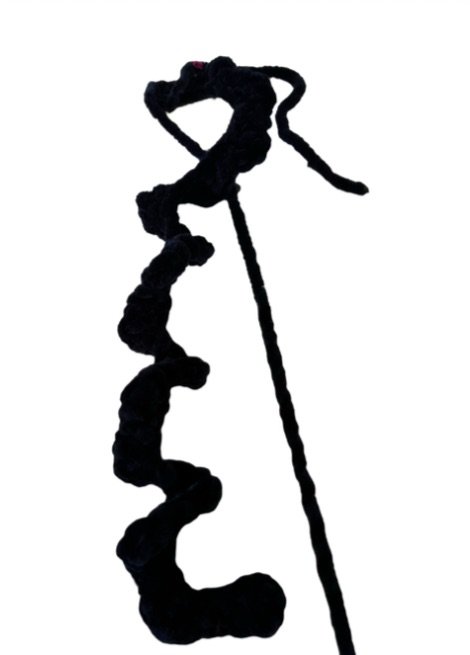
Spine Spikes
In accent color
Ch 50. Starting in the second ch, *sc, hdc, sc into 1
stitch. Slip stitch in the next 2 stitches.
* Repeat all the way down the ch. when you get to the last ch place sc, hdc, sc, sl st.
F/O leaving a long tail for sewing onto body/tail.
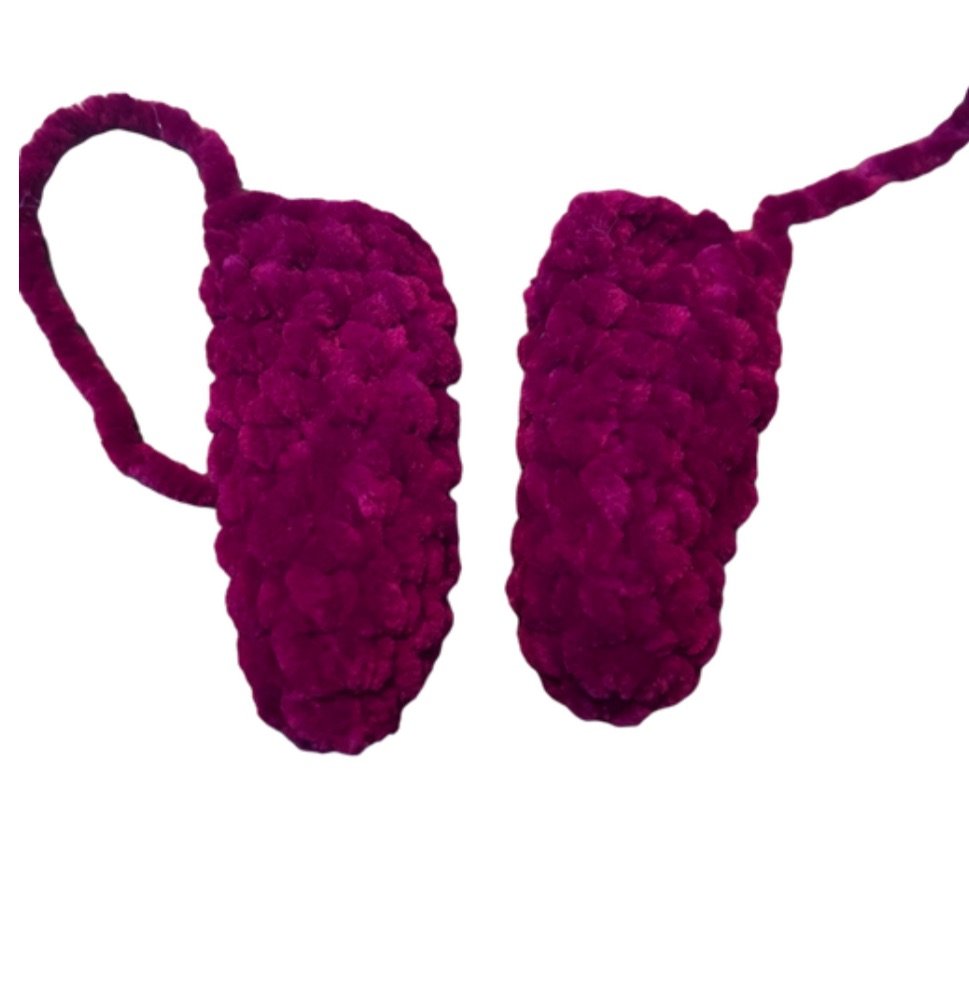
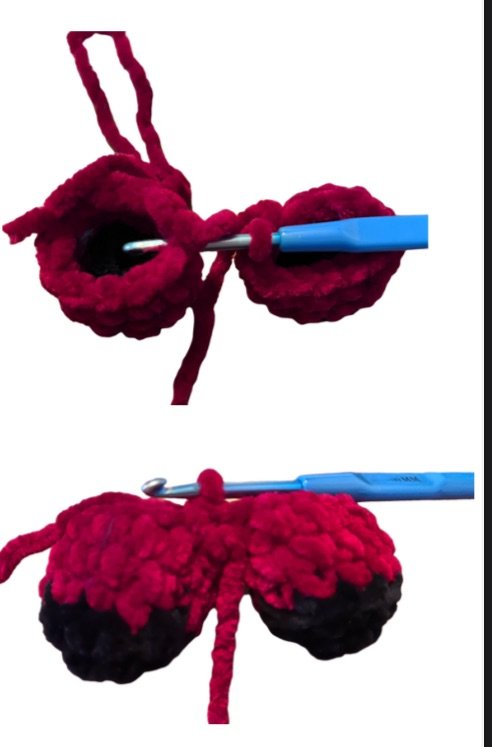
Legs
Make Two:
F/O first leg leaving a long yarn tail to close up the hole between the legs later on. DO NOT F/O the 2nd leg.
Starting in accent color:
1. 6 sc into mc
2. *inc* x6 (12)
Color change to main color:
3. BLO 12 sc
4-5. 2 rounds of 12 sc
Connect 2nd leg to 1st leg with a sc. This is the first stitch of the next round.
Body
6. 1 round of 24 sc
7. 9 sc, *inc* x6, 9 sc (30)
8-10. 3 rounds of 30 sc 11.
*3 sc, dec* x6 (24) –Sew hole closed between the legs.
-Start stuffing and shaping.
12-14. 3 rounds of 24 sc
15. *2 sc, dec* x6 (18)
16-17. 2 rounds of 18 sc –Continue to stuff and shape.
18. *1 sc, dec* x6 (12)
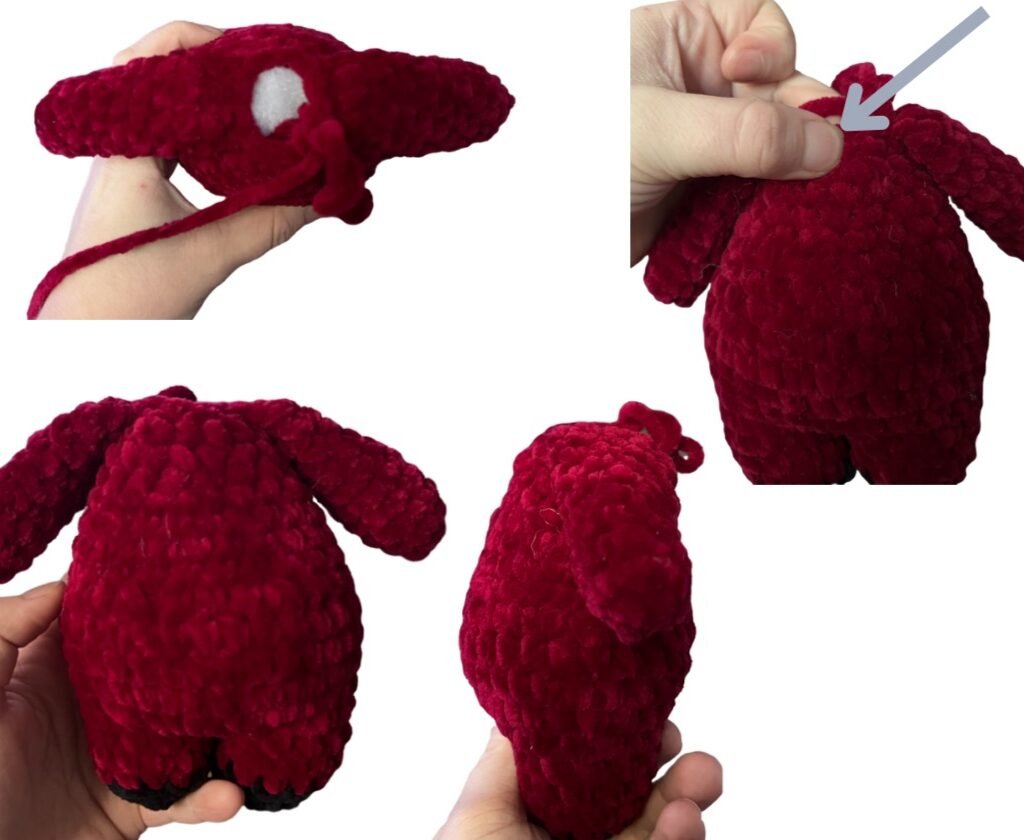
19. 4 sc, connect first arm with 4 sc, 2 sc, connect second arm with 4 sc
-This is a shift round. Your new starting point is now the stitch next to the arm.
(See arrow)
-Note: you may have to adjust the arm placement depending on how your work spirals.
Head
20. *inc* x 12 (24)
21. *3 sc, inc* x6 (30) -Make sure you have completely stuffed the body.
22. *4 sc, inc* x6 (36)
23-27. 5 rounds of 36 sc
-Insert eyes between rounds 24&25, 6 stitches apart, making sure they are centered.
28. *4 sc, dec* x6 (30) –Start stuffing and shaping the head.
29. *3 sc, dec* x6 (24)
30. *2 sc, dec* x6 (18) -Don’t forget to stuff and shape.
31. *1 sc, dec* x6 (12)
32. *dec* x6 (6)
F/O, finish stuffing and close head.
Assembly
Wings:
Place the wings in the middle of the back. You want the wings a few stitches away from each other but not too far apart, because you will be sewing the spine spikes in between the wings as well.
Sew the wings on by following the wing bones about 1/4 of the way up the back of the body. You can sew a few stitches into the head so that wings don’t get floppy.
Nose:
Sewn on centered between the eyes. Leave a 1 sc gap between each eye and the nose. You can stuff the nose as you’re sewing on to make it a little easier so that stuffing doesn’t show through.
Tail:
The tail is sewn 1 round below the wings, going all the way down to the legs. You may need to pin your work in place before sewing.
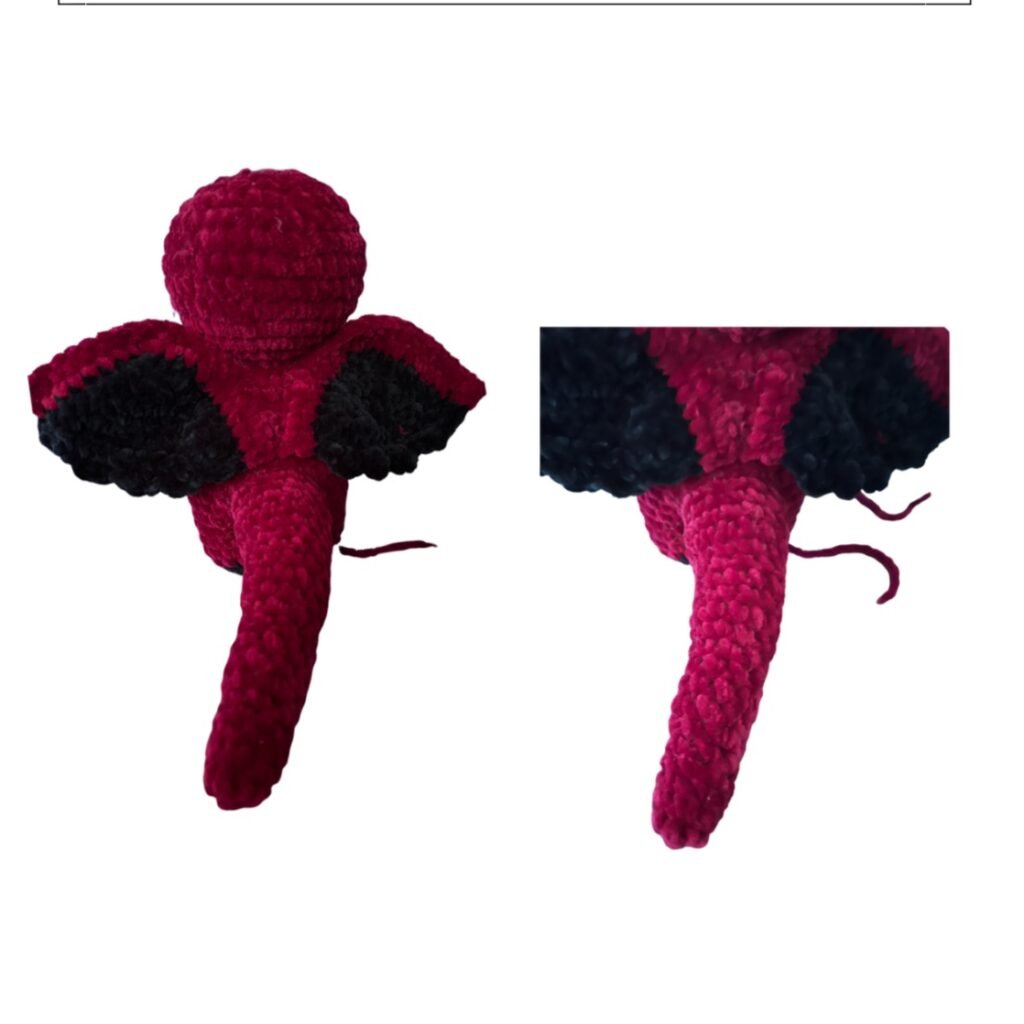
Spine spikes and Horns:
Spine spikes are sewn down the MIDDLE of the dragons back. I start at the tail and work my way up, making sure to keep it as centered as possible.
The horns are sewn onto the head on each side of the spine spikes. Start about 1 round away from the spikes. Make sure to stuff the horns.
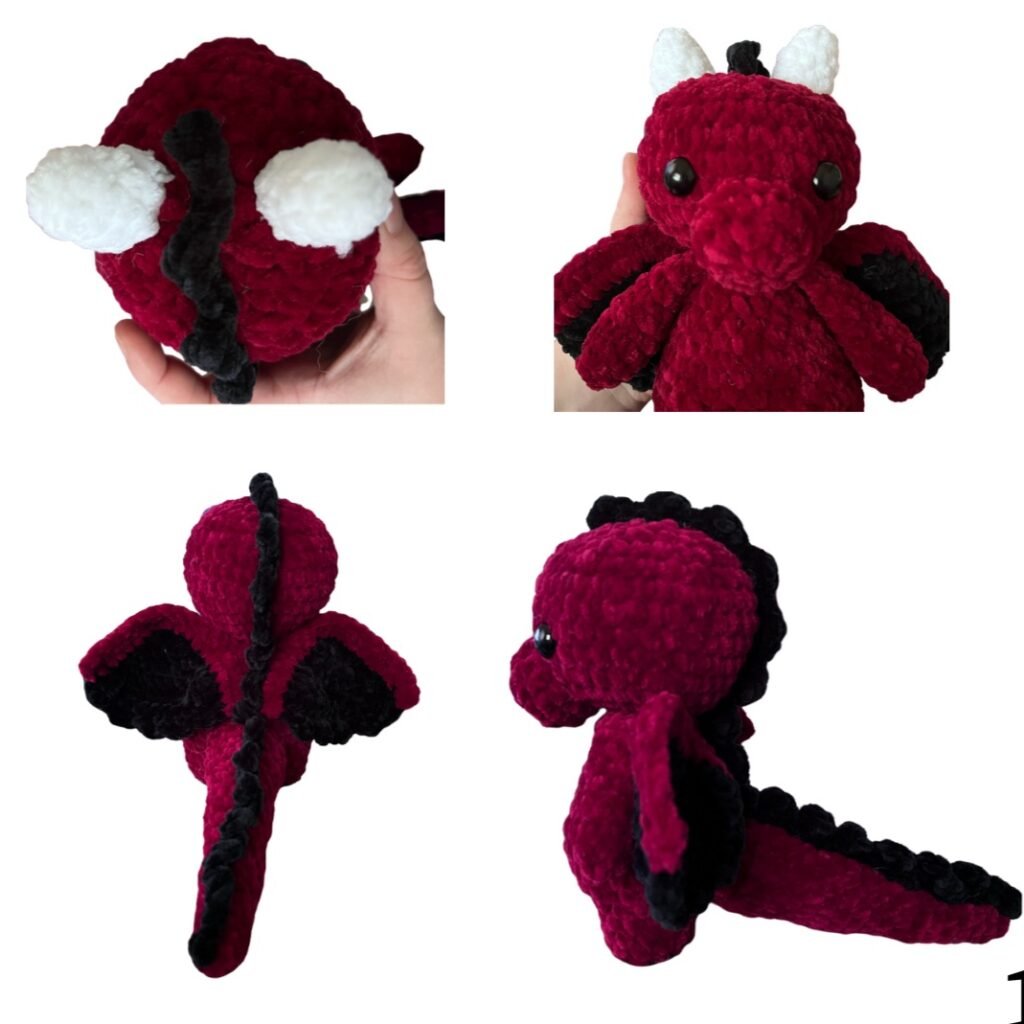
Finishing Details:
– Add eyebrows and nostril details with a black worsted weight piece of yarn.
-Add belly lines with parfait chunky in your accent color.
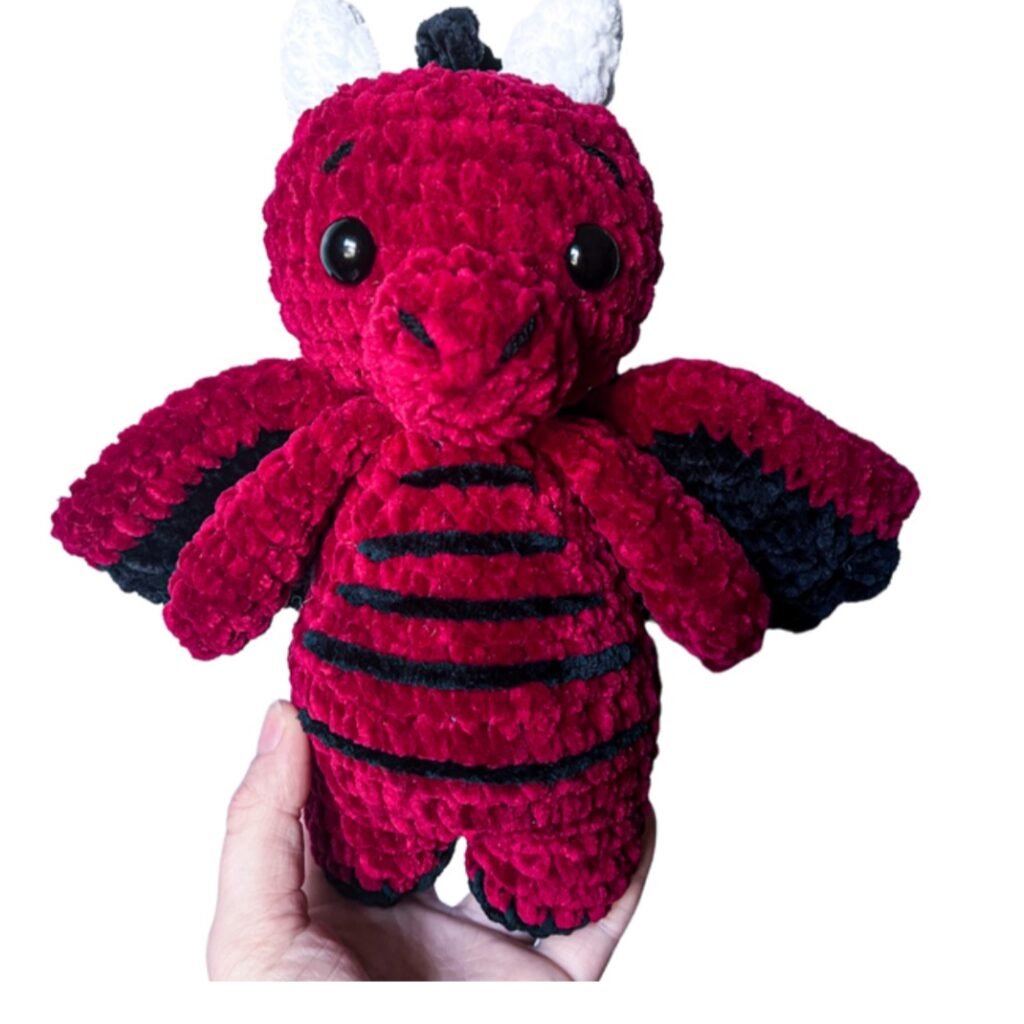
CONGRATULATIONS!! You finished Steve the dragon! 🐉 I hope you enjoyed this pattern and found it easy to follow. I look forward to sharing more patterns with you!